| INDEX | 1300-1599 | 1600s | 1700s | 1800s | 1900s | CROSS-ERA | ETHNO | |
| MISCELLANY | CONTACT | SEARCH | |
|
|
This page is only an add-on and assumes that you have read and understood the basic instructions. Those were about making a pair of half-boned stays from two panels with straps and hidden tunnels. These here are about a pair of fully-boned stays from five panels, without straps and with visible tunnels. The aforementioned features can, of course, be combined to result in five-part half-boned stays with straps, or fully-boned two part stays without straps. You just have to apply some thought.
However, the five-part pattern is better suited for fully-boned stays than the two-part one: The latter relies on diagonal bones for the proper shape, but fully-boned stays require that all bones lie parallel, with the seams lending the shape. I assume that you want the stays to be authentic because if you didn't, the two-part version should work well enough while not flaunting the machine work too much. Most people who want fully-boned stays do because they like the decorative look of the hand-sewn tunnels.
Before you invest the amount of work that authentically-made fully-boned stays require, you should have acquired some experience making the simpler half-boned variety. Some 150 hours of work, if not more, went into my first fully-boned stays. With that much work, one should not be niggard about the materials used: Good, possibly even hand-woven linen, fine silk, high-quality wool and silk or linen thread. Multiply 150 hours of work with an hourly wage you think reasonable: Is the cost of material a patch on it?
Because of the amount of work required, I strongly recommend making a mock-up, even if you've already made two-part stays and/or if you're using a commercial pattern. Below, I will assume that you have already done so. A mock-up is made the same way as the proper stays, only out of cheap fabric, machined, and without neatening. Do not use less boning, flimsier fabric, or fewer layers: You may regret it. Deeply.
As in the basic instructions for the half-boned stays, with the following differences:
Boning 30-50 metres at 5 mm width. I know it's a bit vague, sorry, but I'm pretty sure I've needed something like 30 metres, while other, slimmer people tell me they needed more than 40. Anyway, usually you use plastic boning, which behaves much like real whalebone. For larger sizes or hollow backs, part of the boning should be made of steel, especially round the sides and back. Don't go above 20%, or maybe 30% in extreme cases. Of course you can also use boning of 6-7 mm width, but the result will look better the narrower the boning is.
You'll need less edge-binding tape because you don't have to go around the straps. I reckon 2 ½-3 metres. Since we're looking at making authentic stays this time, the tape must be silk (taffeta or ribbed), but that is hard to get these days. Therefore, I favour leather, which was used for at least half of the extant stays I've seen so far, if not more. Leather bends well round curves and even the tab slit ends, and you don't have to fold the edges under. Choose as thin a leather as you can find. Glove leather is best, but in a pinch, the kind used for window cleaning will do. The colour should be white, off-white, or very pale grey, beige, yellow. In case of kid, half a skin is easily enough. Instead if leather needles, I prefer pearl embrodery needles. On account of being very thin, they go through the leather well while making small holes so that you can sew close to the edge of the leather without fearing that the edge is ripped open.
The thread for making the visible tunnels should be thicker than modern sewing thread and of a colour that goes well with the top fabric and the binding tape. It looks best if the tape, the thread and lacing cord are of the same colour, but contrasting to the top fabric. Look for vintage linen thread at flea markets and on ebay, new linen thread in lacemaking, shoemakers' or bookbinders' supplies, and if all else fails, consider silk buttonhole or embroidery thread. If you can choose, go for size 25-40*. A 25 gram spool of size 30 should be enough, more if the thread is thicker. 50 would be too thin.
The tunnels being visible, they must be sewn from the outside to make sure they don't look crooked, so you'll have to mark them from the outside. Of course, the lines should be invisible when the stays are finished. One solution is "magic pens" which are used for silk painting: Depending on the fabric, the lines vanish by themselves after one or more hours. Unfortunately, I've always used fabrics where the lines were already halfway gone by the time I got to the end of a tunnel. It was impossible to draw more than one line at once. Still, I suggest you try such a pen, and if it doesn't work for you, switch to a soft, well-sharpened pencil. You may not be able to remove the lines later, but if you faithfully sew along them, they will be next to invisible. If you're lucky, you may be able to find a set of tailor's chalk mines, holder and sharpener. Something similar can be found in artists' supplies with graphite, charcoal, or chalk mines. Since chalk mines (both tailors' and artists') are extremely soft and relatively thick, be prepared to sharpen them very frequently.
I cannot offer a proper pattern here since those I have all fall under copyright. I have used the one available from J.P. Ryan and am very satisfied with it.
 The
pattern overview** (click to enlarge) goes like this:
The
pattern overview** (click to enlarge) goes like this:
As you see, there are five pattern pieces per side. This can make adjustments easier than in the two-part pattern, in that additions or subtractions from the width can be distributed among more seam lines. On the other hand, a larger number of seams also means that you'll have to be very exact indeed when marking the seam lines and sewing them up, otherwise the top, basis and lining layer will not lie smoothly on top of each other. If you're not careful, you'll end up with warps that can ruin everything.
The pieces for the centre front and back are cut twice in the fold, all others four times. Allowances only at the sides. Don't cut the tab slits yet and cut the lower edge straight, only marking the tabs: In some cases, you can squeeze another bone in if you move a tab a few millimetres to one side or the other. As with the basic, two-part stays, leave the parts folded wherever you want to have lacing. For each pattern piece, baste two layers together and treat them as one. Sew the pieces together and iron the allowances to one side.
Cut all parts twice of top fabric. If you have back lacing only, cut the front only once in the fold. Normal seam allowances at the sides, 2-3 cm at the lacing edges, and about 5-10 mm fraying allowance at top and bottom. Most top fabrics, especially silk, will fray due to the extensive handling that sewing the many tunnels necessitates. Better to cut off the surplus later than to have so much of the top frayed away that the binding tape cannot cover it anymore. Sew the parts together and iron the allowances to one side (remember this pic?). Along the lacing edges, fold the top fabric to the inside of the stays and baste.
Place the basis on a flat surface and the top fabric onto the basis. Smooth the top fabric out, make sure that the edges lie exactly on top of those of the basis, and pin it to the basis along the seam lines. Baste the layers together along the seams and once around the edges. To make sure that the seam lines meet exactly, push the needle into the seam from one side, then flip the workpiece and see that the needle comes out of the seam on the other side. When you've finished basting, lay it out flat again, outside up, and carefully pull on the edges. If the top fabric shows any signs of overstretching while there's still give in the basis, you have not drawn or sewn the seam lines exactly enough. Mark the places and let out the top fabric seams there. But before you take the workpiece apart to do so, flip it over and do the same test with the inside up. If the basis overstretches, either let out the basis seams or take in the top fabric seams in in those places. Be careful when redoing the seams: In most cases, it's only a matter of a millimetre or two. You may wonder whether it wouldn't be easier to threat the whole stays, or half if it, as one part and let the overstreching in one pattern part balance out the warping in the next one, allowing the seams to slightly shift away from each other. Yes, it would be easier, but remember that each seam is also one side of a boning tunnel. A slight displacement of the seam would result in a tunnel that is too wide or too narrow, and that shows.
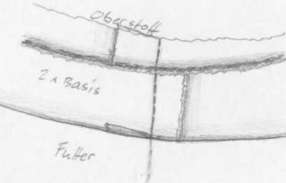
When you've managed to have the layers lie smoothly, baste them together again, then sew the tunnels. Start by sewing along each seam line. When those are done, do the ones next to the lacing edges first. As usual, do one tunnel right next to the edge, then a 10 mm gap for the eyelets, and then all parallel right up to the next seam. In back, all tuinnels lie parallel to the seam that faces the centre back. In front, they lie paralle to the seam that faces the centre front. (see sketches). Apart from one, the parts are wider at the top than at the bottom, so you push the bones in from the top. In the other part, you push them in from below. See to it that the bones end 10 mm shy of the top and bottom edges and at least 5 mm away from the sides of prospective tunnel slits. If a bone can't be pushed through into a tab because that would take it to within 3-4 mm of the slit, move the slit to allow the bone in. The next one or two bones (depending on their width) will have to end 10 mm above the end of the slit anyway. Each bone that runs though into a tab rather than ending above contributes to wearing comfort.
 The
sketch on the left (click to enlarge) shows how the tunnels lie in case of front-and-back
lacing. Back-only is shown in the sketch further up the page.
The
sketch on the left (click to enlarge) shows how the tunnels lie in case of front-and-back
lacing. Back-only is shown in the sketch further up the page.
The tunnels can be sewn using backstitch, which is probably the way it was done "back then". However, this considerably increases the amount both of work and of the expensive linen or silk thread. Therefore I prefer to use simple running stiches, filling the gaps on the way back. It doesn't look quite as neat as a well-executed backstitch, but if it's done with care, it hardly shows. Make the stitches 2-4 mm long. Backstitch consumes 1 ½ times as much thread.
The stitches will make the top fabric pucker a bit, but don't worry: As soon as the boning is in, it will smooth out. The pattern of silk damask, which seems to vanish beneath all the seams, will also re-appear. When the boning has been shoved in, lay a strong seam (preferably using the tunnel thread) all around the fabric edges, closing the tunnels top and bottom, so that the bones can't chew through the seams that hold the binding tape.
 Cut,
sew and iron the lining as you did the top fabric and lay it smoothly onto the
stays from the inside. This time, the seams do not have to match up exactly
, but it doesn't hurt if they do. Baste to the stays along the edges. Along
the lacing edges, fold the allowance under and seam it onto the top and basis.
Cut the tabs slits, round the tabs off, and attach the tape/ribbon/leather as
described in the basic instructions. Done!
Cut,
sew and iron the lining as you did the top fabric and lay it smoothly onto the
stays from the inside. This time, the seams do not have to match up exactly
, but it doesn't hurt if they do. Baste to the stays along the edges. Along
the lacing edges, fold the allowance under and seam it onto the top and basis.
Cut the tabs slits, round the tabs off, and attach the tape/ribbon/leather as
described in the basic instructions. Done!
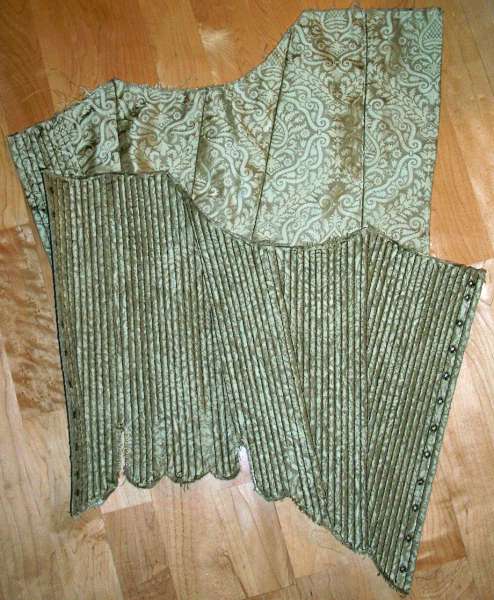
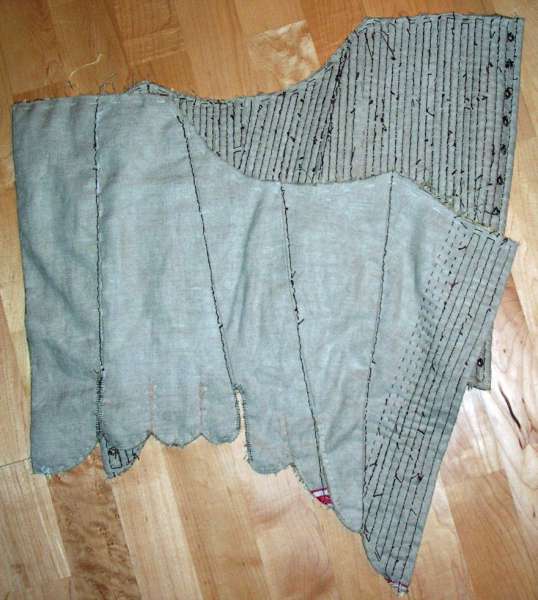
Left (click to enlage): My latest fully-boned project with front-and-back lacing in half-finshed stadium. One half has already got all the tunnels as well as the lacing eyelets, while I've only just started on the other. The tabs haven't been cut yet, and in some cases I've regretted having already cut the rounded tab ends. Materials used: Mangle sheet linen for the basis (too soft on hindsight), silk damask for the top, brown linen thread for the tunnels, brown buttonhole silk for the eyelets. Not yet visible: Stiff white bedsheet linen for the lining and pale grey kid velours for binding.
Chapter 6: Fitting stays (advanced)
*) Linen thread usually comes in sizes given as, e.g., 25/4 or
80/2. The latter number tells you how many threads it is made of (i.e. 4-ply
or 2-ply). The former number tells you how long one gramme is: In case of size
80, one gramme runs 80 metres long, in case of size 25, it's only 25 metres.
So, with a grain of salt, higher numbers mean thinner thread. A 25 g spool of
30/? thread, then, gives you 750 metres of thread. I don't know whether there
are any non-metric sizes – in my research, I have only come across European
makes.
**) J.P. Ryan has graciously allowed me to use the overview for her pattern.
Content, layout and images of this page
and any sub-page of the domains marquise.de, contouche.de,
lumieres.de, manteau.de and costumebase.org are copyright (c) 1997-2022 by Alexa Bender. All rights
reserved. See Copyright Page.

GDPO


This work is licensed under a Creative Commons License.