| INDEX | 1300-1599 | 1600s | 1700s | 1800s | 1900s | CROSS-ERA | ETHNO | |
| MISCELLANY | CONTACT | SEARCH | |
Fitting a corset (or stays) pattern isn't a simple task. Typically, you will only have to do this if your body is unusual in any way, e.g. a size 20 chest with a size 8 waist. Most commercial patterns only work well for average figures. Fitting the pattern can save you the hassle of up to three mock-ups, but in most cases, one mock-up will still be necessary. I've said about staymaking in general that it should only be done by people who have some sewing experience. Well, resizing and fitting stays should only be undertaken by people who either have some experience with modern resizing or with making stays or corsets.
We are looking at the two-part pattern known from the main stays page. The principle is the same for the five-part pattern, except that the side line (i.e. the border between front and back part) runs diagonally through the middle pattern part, which makes it difficult to match the front and back measurements used below to the pattern part. In the two-part pattern, on the othe hand, the side seam corresponds to the natural side line.
The follwing measurements are needed::
The g in the abbreviations stands for your body measurement, in contrast to the measurement of the paper pattern. V stands for front, H for back*.
When taking the measurements, wear a tight-fitting T-shirt with side seams. It replaces the shift, which will have to fit underneath the stays, and also gives you a guideline as to whre your side line is.
Take the breast and waist width in two parts: Once around the front from side line to side line, once around the back. When measuring the front breast width, lift and slightly compress the breasts as stays are wont to do. The back width (R) goes from one armscye (outer edge of the scapula) to the other. The front edge (V) from the (lifted) nipple to the waist, the side length (S) from the armpit to the waist. Don't go all the way into the armpit - start measuring at a point where you think that an armscye wouldn't pinch, typically about 4-5 cm below. It's not a problem if Rg and Sg are a little too short.
OVg and OHg must add up to your breast circumference, TVg and THg to your waist circumference. If that isn't the case, you probably haven't determined the side line properly. If the difference is only a centimetre or so, never mind. If it's more, please measure again and make sure that the side seam of the shirt doesn't move about. Have someone else take the measurements and don't move (most importantly, don't lift your arms) any more than absolutely necessary.
 Now
compare the actual measurements with that of the pattern. Your measurements
(g) relate to the pattern measurements as follows:
Now
compare the actual measurements with that of the pattern. Your measurements
(g) relate to the pattern measurements as follows:
The horizontal measurements OVg, OHg, TVg, THg and Rg must be divided by two because the pattern only represents one half of the body. Back-lacing stays should sport a lacing gap in back, so the back measurements Rg, OHg and THg must be compared to R-y, OH-y anf TH-y, with y being the width of the lacing gap, i.e. 2-5 cm. (In case of front-and-back lacing, there should not be a gap in front, so it's the same as for back-only lacing.) Sg and Vg are vertical measurements, so they can be used as is.
If the stays are properly laced, they should have a gap of about 3-6 cm in back. Therefore, TH of your pattern should be 1.5-3 cm smaller than ½ THg, same for OH and R. This is also valid if you're making front-and-back lacing stays because there should not be a gap in front.
OV must corespond to ½ OVg, TV to ½TVg. S and V correspond to Sg and Vg. That is... actually V should be a bit longer than Vg: The stays should go up a bit higher than the nipple. Let's call that additional bit 'x'. So V should equal Vg+x, x usually being about 0.5-1 cm. I recommend cutting the neckline higher than the measurements imply - you can always cut it lower later.
So how do we make the pattern measurements match the natural ones?
It's relatively easy for S and V because vertical measurements rarely differ by more than 1 cm. Such small differences can easily be adjusted on half-finished stays. Even if the difference is greater, adjusting is easy if the S-Sg and V-(Vg+x) difference is the same: Cut a horizontal line through each pattern piece, somewhere between waist line and armscye, and either make the bottom and top part overlap (if Vg+x < V) or pull them apart and glue a paper strip into the gap. The same method is recommended by and described in modern sewing books. Smooth out the side line afterwards so that it is a straight line again.
If S-Sg and V-Vg are different, shorten or lengthen the pattern as described above, using the smaller difference as a guideline. Example: V is 2 cm longer than Vg+x, while S is only 1 cm longer than Sg. Shorten the pattern by 1 cm. Now the front is still 1 cm too long. Adjust it by cutting the neckline 1 cm lower. If the difference is greater in back than in front, cut the armscye deeper.
I was asked how long the front edge should be. As for the top edge, I have said it above: Top edge of the nipple while the breast is pushed up, plus about 0.5-1 cm (the infamous 'x'). The top edge should not be much higher than that because otherwise it would show through the dress, and not much lower because the breast would be squeezed over the edge. As for the bottom edge, the CF point should go considerably further down than the waistline, and a bit lower than the bit of the hip bone that you can see (or at least feel). You should be able to sit down without pain, i.e. the point should not dig into the pubic bone. The bottom edge to both sides of the point should not touch be the thighs when sitting, but only just. If you cut the front-tip-to-waistline arch too high, any fat you may have will be squeezed out from under the edge of the stays. However, that's better than having the stays ride up on the thighs: It may not look good, but nobody will see it under the shirft and wide skirts. Do not try to make the front of the stays longer than all that: Trying to press the belly flat is just modern aesthetics. Forget them!
If the circumference measurements differ only a bit, you can add/subtract that in the side seam and at CF/CB, but no more than about 5 mm per edge and up to 1 cm along the CF/CB. More than that would change the size of the armscye too much. You may not have to fit a sleeve into it, but it may mean that it pinches (if too small) or the breast falls out the side (if too large). That's why you compare the front and back measurements separately: Some people need more width because they have a wide back, some because they're well endowed. If OVg is larger than OV, for instance, while OHg is the same as OH, then you should make the front pattern parts wider but not the back pattern parts. Then again, if OVg is larger than OV, but TVg is the same as TV, you must add some width to the chest of the front, but not to the waist. You can do that by adding a bit to the top of the side seams and/or CF but nothing to the lower end.
I can't go into details for every possible combination, but since you know about resizing, I expect you can work out the rest by yourself. Just make sure that your adjusted R equals Rg, i.e. cut the armscye deeper into the back if necessary. If 5 mm per edge aren't enough, you'll have to cut the pattern parts in two and use the old pull apart/overlap method. The red lines in the above diagramme show where you should cut. Actually I prefer this method to adding to the edges because it's more accurate.
But alas, we're not finished yet. As you may have noticed, the above is only valid for stays that don't compress the body at all. While it is a cliché that women of the 18th century tight-laced until they fainted, stays should indeed be somewhat tighter that the natural body measurement because
Loose stays tend to move around and chafe, and to ride upwards, causing the boning to dig into the armpit rather painfully. Therefore, the overall circumference of the stays should be smaller than that of the body. It's difficult to say by how much because it depends on the figure. Rule of thumb: The more soft tissue there is, the more it can be compressed. That doesn't just go for love handles, but also for the chest. Try subtracting about 2 cm from the overall circumference wherever you have little soft tissue and up to 6 cm where you have lots. Remember that part of the compressibility of the breasts has already been taken care of by how you've taken your measurements, so don't subtract too much in that area. It's better to make the stays a little to small than a little too big: Nobody will see it if the lacing gap is too large, but you can't lace any tighter than edge-to-ege.
Complicated? Yes, unfortunately. But properly fit stays will save you a lot of pain. Just bear with me for a bit of theory in case the mock-up still doesn't fit.
For a proper fitting, at least some of the the boning should be present. Along the seams, lacing edge(s) and around the breast, minimum - but the more, the better. Pay special attention to the lacing gap. Ideally, it should be the same width everywhere. A fish-shaped gap isn't a disaster, but it shows that the pattern wasn't perfect.
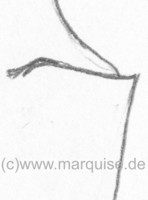
If the gap is wider round the top than anywhere else, the chest width should have been cut wider. Check whether it's the front or the back measurement or both. If the gap is nicely parallel, but the breasts are squeezed out the top (see pic 1 further down), make OV larger and, to make up for it, OH smaller.
If the lacing gap is wider round the waist than anywhere else, it's not so clear-cut. Maybe the waist is cut too small, but it's also possible that the stays waist is lower than the natural waist. In the latter case, the ends of the tab slits are too close to the hip bone so that they can't spread out enough to give the hips the room they need. Take a tape or narrow belt and pull it really tight, under the stays. It will automatically come to sit where your natural waist is. Now does the waistline ( = end of the side tab slits) of your mock-up stays correspond to the waistline as determined by the belt? If it does, cut the waist wider. If the slit ends sit lower than your natural waist, cut them deeper and try again. In this latter case, you can still use the pattern as-is: Just cut the tab slits deeper and then clip a bit of length off the tabs.
Most often, the lacing gap is wider in the middle than it is at the top or bottom. This is so common that it's acquired a name of its own: the fish. This is only a problem if the fish is rather fat: In that case, the bones along the edges would tend to twist, their edges digging into the small of the back. If you can still wear the stays for some hours without chafing, changing the pattern is optional.
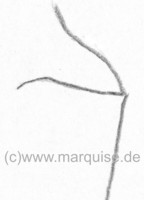
A fish may have various causes. Stays are meant to force the body into a funnel shape, but the ribcage is more like an elliptical cylinder. The funnel shape will only emerge if the chest (that is, the bosom) has a certain size and if there is enough soft tissue around the lower ribs that can be displaced - squeezed up or down, that is. In case of very slim figures, for instance, the gap tends to be widest at the level of the lowermost rib because there isn't any soft tissue that can be displaced. That's the most problematic case because the most obvious solution lies in adding width at the level of the lowest rib, but not above and below - which in effect means giving up the desired funnel shape and replacing it with something more resembling the hourglass shape of the 19th century. This is not an option if you want to achieve the typical 18th century shape. For very slender figures, I suggest lacing less tightly around the waist and the chest, and placing pads under the breasts to prevent them from slipping into the hollow (as in picture 3 below).
In case of medium to fat figures, the widest part of the fish is usually lower, around the waist line. It's usually due to the understandable (and historically accurate) wish to achieve a small waist and being too optimistic. I'm afraid that you will have to add some width to the waist - or hope that you'll manage to lose some weight.
Another possible cause is that the waist of the stays is higher than your natural waist. Use the same method as above under the heading "Too tight round the waist". If this proves to be true, you will have to make a new paper pattern with a lower side waistline.
 |
 |
 |
 |
| picture 1 | picture 2 | picture 3 | this is just right |
Until not so long ago I had concentrated on the width because that usually creates the most problems. A user now asked me this: How long should the centre front tip be, and how far up should the upper front edge go? A fair question ideed.
As for the CF tip: For most people it would be fine if it reached to the top of the pubic area. There's no good reason to make it longer because it wouldn't help to achieve a flat belly (which wouldn't be necessary under all those skirts, anyway). If it was longer, it would become uncomfortable when sitting down, especially if you have stout thighs.
Determining the upper front edge is not quite as easy. In case of large and soft breasts, it should at least cover the nipple, because otherwise the breast would be squeezed out over the top (pic 1, above). Not only doesn't it look good, but it also makes fitting a top garment rather difficult. An effect as in pic 1 can also point to the OV being cut too small.
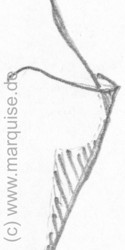
If the chest is relatively small, the top may be cut a tad lower. Pic 2, for instance, shows a smallish chest that can't fill the top. The front edge would show through the top garment as a sharp bend. As above, only the other way around, pic 2 may also point to the OV being cut too wide. In case of a normal to large chest, it may also be a sign of suffering from the "hollow space" syndrome of pic 3. We'll come to that.
In order to find out where the edge should be in relation to the nipple, put your flat hand on the underside of one breast, upper edge of index finger matching upper edge of nipple, and push the beast up and towards the body. If that creates a pic 1 effect, move your hand a little higher and try again. Use the result as a template for the edge. Alternatively, lace less tightly artound the top - but in that case, you'll probably become a victim to pic 3.
The "hollow space" syndrome befalls both the very well endowed and the under-endowed. The latter find their chest flattened rather than pushed up, while the former have the choice of either overflowing (pic 1) or loosening up, resulting in pic 3. It's all down to the desired, straight-front funnel shape as opposed to the various curves created by ribs and/or chest. Both figures have to give the chest more room, resulting in a hollow space below the breasts which they would slip down into. The remedy for both is half-circle or half-moon-shaped pillows stuffed with unspun cotton or wool which are either shoved under each breast after putting on the stays, or sewn to the lining of same.
*) I first wrote this page and drew the sketches in German, where waist=Taille, therefore T, and front=vorn, therefore V, etc. I decided against "translating" the abbreviations because I would have had to change the sketches, too, and I know for certain that I would have mixed things up in the text.
Content, layout and images of this page
and any sub-page of the domains marquise.de, contouche.de,
lumieres.de, manteau.de and costumebase.org are copyright (c) 1997-2022 by Alexa Bender. All rights
reserved. See Copyright Page.

GDPO


This work is licensed under a Creative Commons License.