| INDEX | 1300-1599 | 1600s | 1700s | 1800s | 1900s | CROSS-ERA | ETHNO | |
| MISCELLANY | CONTACT | SEARCH | |
Finding period-correct buttons isn't always easy, but fabric-covered buttons are correct for most eras. Nowadays, you get ready-made blanks in haberdashery shops, but usually they are not the right size, too domed or too flat, and if they don't sit really tightly on the fabric, they tip and show their too modern backs. So why spend money on blanks and be inauthentic if covering fabrics is so simple?
The following instructions may seem too long for something so simple, but that's just because I wanted to take everything into account.
 |
|
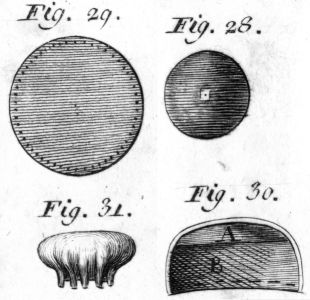
Illustration from the 18th century Encyclopédie:
Fig. 28 is the mould, |
Not every fabric is suitable for covering fabrics. Very thick fabric, for instance, would result in an inordinately large and thick button, unless the mould itself is quite large and thin. So the smaller a button is, the thinner the fabric should be. Fabric that tends to fray is also unsuitable. A little fraying can be tolerated in thinner fabrics because they form smaller knobs in back, so you can give more allowance.
First of all, you need a mould, i.e. an object to cover. Flat buttons are simple:
Anything disc-shaped, such as old coins or discs sawed from a round wooden rod
or even ugly old buttons (the kind with holes). Buttons with a shank are not
quite as suitable because the shank is always in the way. Domed moulds are much
harder to find. In this case, you may have to use buttons with shanks –
or use the aforementioned blanks, but not in the way they are meant to be used...
When the object is found, measure its diameter and draw a circle of twice that diameter plus 5mm onto a piece of paper. If the object is domed, make the template a few millimetres larger. Cut a circle of fabric using this template, but only one!
Sew all around the rim with smallish sewing stitches, about 5 mm inwards from the edge. Leave the end of the thread hanging loose. Place the mould onto the middle of the fabric circle and pull on the thread until the fabric has completely enclosed the object. Now the fabric should lie tautly so that the mould cannot move around within. If that is not the case, the circle was too large. If the edges don't meet in the middle, it was too small. Ideally, the 5 mm allowance should stick up in the middle to form a shank. In case of a thick fabric that doesn't tend to fray, the shank may be smaller or even nonexistent so as not to distort the buttonhole by its thickness.
When correcting the template, remember that a millimetre or two can make quite a difference, so don't over-compensate. Repeat the steps above until you are satisfied that you've got all measurements right. Then you can go and cut the rest of the button covers.
Having pulled the cover tight, stitch through the shank a few times to fix the thread. If there's enough of it left, you can use the same thread to sew the button on. Use the allowance as a shank by sewing trough it
Wednesday, 24-Apr-2013 21:47:20 CEST
Content, layout and images of this page
and any sub-page of the domains marquise.de, contouche.de,
lumieres.de, manteau.de and costumebase.org are copyright (c) 1997-2022 by Alexa Bender. All rights
reserved. See Copyright Page.

GDPO


This work is licensed under a Creative Commons License.