| INDEX | 1300-1599 | 1600s | 1700s | 1800s | 1900s | CROSS-ERA | ETHNO | |
| MISCELLANY | CONTACT | SEARCH | |
Determining the correct size and shape of the armscye is not easy. Another difficulty is the fact that the sleeve pattern cannot be determined by draping. These two are one of the main reasons why I don't recommend this project for beginners. It's easier if you have worked with 18th century sleeves before, or at least seen the pattern. e.g. in the Janet Arnold book.
I have determined the sleeve pattern here using the circumference at the elbow and at the lower end of the armscye for the horizontal measurements, the length of the sleeve from armscye to hem and from shoulder to hem, and the difference between those two for the height of the sleeve head. The rest - the curve of both sleeve head and hem, the angle of the straight back of the sleeve head, the placement and depth of the pleats - is the result of studying the grain direction, measuring, guesswork and experience. Therefore I don't guarantee that it'll fit you. Especially since it's rather unlikely that you have been able to use the rest of the pattern without alterations.
Resizing the sleeve is done in the same way as explained in a good modern sewing book. If you have to enlarge the sleeve, you may have to make the pleats at the top of the sleeve head deeper or fold more than the given five. However, fewer than four and more than six may look strange. In any case, make a mock-up from the altered pattern to see whether the new seam line fits into the armhole. In order to do this, you should first know how the sleeve is set in.
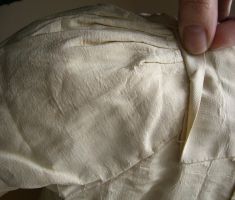
The first half goes as usual: The sleeve is turned right side out, the bodice left side out. Remember it's the straight edge of the sleeve head that faces towards the back. Place the sleeve seam at the lowest point of the armhole. Baste for about 5 cm either side of this point. Now everything is turned right side out and put onto the dummy. From the point in back where the basting stops, fold under the allowance of the sleeve, and pin the marked seam line to that in the back of the bodice up to the point where the pleats start. Do the same in front. These seams should run straight both in front and back, but especially in back. The curces of the sleeve head are either hidden under the arm or in the pleats.
The allowances are folded under at the top of the sleeve as well, then pleated with the outer folds facing towards the back. From the sharp bend at the back of the sleeve head to the end of the pleats, the sleeve seam should be hidden under the robings pleat.
 |
|
The pleats atop the shoulder. Below right, the shoulder seam. Left, the sleeve. Above, my fingers lifting the robings to reveal the sleeve seam underneath. |
If the mock-up sleeve turns out not to fit into the armhole, you may have to change the size of the armhole. Try putting on the dress with the mock-up sleeve basted in and check whether it pinches or seems to wide. Check the elbow width and sleeve length while you're at it. Unless you've cut the sleeve head to small, making the pleats a little deeper and/or folding an additional one should do the trick, though.
If you feel comfortable with the pattern, cut it the same in both lining* and top fabric. Treat them as one. Fold under the allowance of the vertical sleeve seam, the one closer to the back, and top-stitch onto the opposite seam line. Attach sleeve as described above. I could not really see how the sleeve hem is neatened because it was hidden under the ruffles. The top fabric is folded under, but with the vertical seam sewn through both layers, it's impossible that the edge of the lining is also folded under. Most probably it has been left raw, just like so many other lining edges.
Next step: Everything else
*) If the bodice is lined with something coarser than what you see in the pictures of the original, try to find something finer for the sleeves. It tends to make arm movements easier.
Content, layout and images of this page
and any sub-page of the domains marquise.de, contouche.de,
lumieres.de, manteau.de and costumebase.org are copyright (c) 1997-2022 by Alexa Bender. All rights
reserved. See Copyright Page.

GDPO


This work is licensed under a Creative Commons License.