| INDEX | 1300-1599 | 1600s | 1700s | 1800s | 1900s | CROSS-ERA | ETHNO | |
| MISCELLANY | CONTACT | SEARCH | |
|
|
Part 6: Sleeves and the rest
It's time to cover the top edge of the back pleats with a strip of top fabric. That strip should be as wide as the back neckline (plus seam allowance) along the top and somewhat wider along the bottom. Make it something like 8 cm high and give a wide allowance along the top. Set the strip against the inside of the lining, right on right, and sew it on. Turn the allowances of the slanted side eges and pin them in place. Turn the strip up and out over the neckline edge. Pin it to the outside just under the top edge. Smooth it downwards, turn the other edge under and pin. Now check the side edges: Do they cover all of the raw top edge of the back part? Are they roughly parallel to the shoulder seam? If yes, pin them onto the outside. You may want to turn more of the lower edge so that the strip isn't too wide. As long as no raw edges peek out, anything from about 2 to 5 cm is fine. Stitch the lower and side edges with underhand seam stitch.
 The
sleeves: Close sleeve seam. The point of the sleeve head meets the shoulder
seam. Work down from there, around the armpit and up at the front until you're
almost at the top of the shoulder. The sleeve seam should be near the side seam
of the bodice, but it doesn't have to exactly meet it. Arrange the rest of the
sleeve head into 4-6 small pleats. If you have too much sleeve left, you may
have forgotten to make the armscye larger after making fitting darts in the
bodice? If the sleeve is attached properly, the shortest portion will be next
to the elbow bend, the longest next to the outside of the elbow. Neaten the
lower sleeve edge by narrowly turning the edge twice.
The
sleeves: Close sleeve seam. The point of the sleeve head meets the shoulder
seam. Work down from there, around the armpit and up at the front until you're
almost at the top of the shoulder. The sleeve seam should be near the side seam
of the bodice, but it doesn't have to exactly meet it. Arrange the rest of the
sleeve head into 4-6 small pleats. If you have too much sleeve left, you may
have forgotten to make the armscye larger after making fitting darts in the
bodice? If the sleeve is attached properly, the shortest portion will be next
to the elbow bend, the longest next to the outside of the elbow. Neaten the
lower sleeve edge by narrowly turning the edge twice.
In the period that this pattern is made for, there are two ways of finishing up the sleeve: Cuffs (below, left) were worn from the 1720s until the 1750s and, in the clothing of simple folk, up until the 1780s. From about 1750 on, flounces (below, right) became the more fashionable solution. The flounces are given in the pattern.
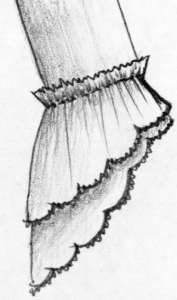
 The flounces
will look halfway period if you cut them with pinking shears. In fact the edges
should be all tiny little curves (see picture to the right). They were punched
with special pinking tools. Gather the upper edges of the flounces and sew them
on with a little head of 1.5-2 cm, or cover the upper edge with a strip of fabric.
Whether you gather and attach all two or three flounces together
or each in turn depends on the thickness of the fabric: Whatever looks best.
The smallest flounce sits on top. The longest part of the flounces is
at the outside of the elbow, where the sleeve is longest.
The flounces
will look halfway period if you cut them with pinking shears. In fact the edges
should be all tiny little curves (see picture to the right). They were punched
with special pinking tools. Gather the upper edges of the flounces and sew them
on with a little head of 1.5-2 cm, or cover the upper edge with a strip of fabric.
Whether you gather and attach all two or three flounces together
or each in turn depends on the thickness of the fabric: Whatever looks best.
The smallest flounce sits on top. The longest part of the flounces is
at the outside of the elbow, where the sleeve is longest.
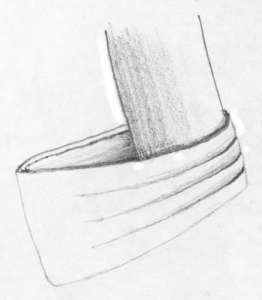
If you choose cuffs instead, cut it once in top fabric, once in lining and, if both fabrics aren't all that stiff, once in interlining. The cuff must not hang limply but actually stand all by itself if you set it on the table. The shape is that of a rectangle, the height between 15 and 25 cm, the width something like 50-65 cm. The earlier in the 18th century, the bigger the cuff. The seam usually sits at the elbow bend.
Sew the shorter edges of together to form a tunnel, both in the top fabric and lining. If you have three layers, treat top fabric and interlining as one. Place top and lining right on right and sew them together along one of the longer edges. Turn outsides out, fold the allowances under and sew together using seam stitches.
Make three (in case of small cuffs, two) upward-facing pleats across the seam. The pleats gently taper out on their way towards the back and stop some cm from there. Fix them in place with running stitch, making the stitches inconspicuous from the outside. The cuffs are sewn onto the sleeves so that the pleats sit in the elbow bend, a bit up from the end of the sleeve. The seam should run along the upper edge of the cuff and end at the side of the arm. The rest of the cuff is left to hang (or rather, stand) loosely, as seen in the picture above. It is perfectly normal than you can look through the cuffs from up and behind.
Now do a last fitting. Put on the robe over stays and panier (ideally also with a petticoat), pin a piece of mock-up fabric to the front of the stays, and pin the front edges onto it. Be sure to wear your period shoes or heels the same height as those of your period shoes. Have your helper mark the robe length at the centre back, at the sides and at the front. At the front edge, the skirt should be as long as the jupe, which is 5-8 cm above ground. At the sides, it should be floor length or 2-3 cm above. In back, the train length is a matter of taste. Determine it by taking a slow step forward so that the train stays behind, making the back slope from the shoulders down. Add 10-25 cm from where it hits the ground. Those three markings are all you need for the hem. While you're at it, have the helper note the front and side skirt length, i.e. from waist to ground, the side measured over the side of the panier.
Don't undress yet: Determine the shape of the stomacher first. Have your helper mark it on the pice of mock-up fabric: Along the top of the stays, along the front edges, and roughly where the stays end below the waist. This is not the proper shape, but rather the minimum size. It's enough to work from. Now you can undress.
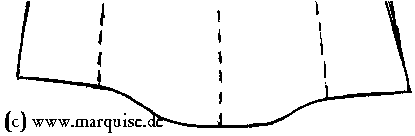 Let's
do the hem. First, copy the front and side markings to the other, as yet unmarked
front edge and side seam. While you're at it, pin the front edges and side seams
of either side together at the markings so that you can cut both in one go.
You know, like cutting a pattern piece "once in the fold", the fold
being the CB in this case. Place the robe on the ground so that the hem lies
flat from front edge to side seam. Mark a straight line from the front hem marking
to the side hem marking. Make sure that the two layers lie smoothly, then pin
them together to keep them in place while cutting. Rearrange the robe so that
the hem lies flat from side to centre back. Draw another line from side to back
hem marking. However, this doesn't mark the hem proper, it's just a guideline.
Mark the hem beginning at the side, continuing the front-to-side hemline at
first, then making it gradually steeper and flattening out again as it approaches
the CB. It should be almost horizontal for the last 10 cm so that, if you unfold
the back and lay it flat, you get a gentle curve around the back (see sketch
above). Again, smooth the two layers out and pin them together. When cutting,
remember to add a turning allowance of about 1 cm.
Let's
do the hem. First, copy the front and side markings to the other, as yet unmarked
front edge and side seam. While you're at it, pin the front edges and side seams
of either side together at the markings so that you can cut both in one go.
You know, like cutting a pattern piece "once in the fold", the fold
being the CB in this case. Place the robe on the ground so that the hem lies
flat from front edge to side seam. Mark a straight line from the front hem marking
to the side hem marking. Make sure that the two layers lie smoothly, then pin
them together to keep them in place while cutting. Rearrange the robe so that
the hem lies flat from side to centre back. Draw another line from side to back
hem marking. However, this doesn't mark the hem proper, it's just a guideline.
Mark the hem beginning at the side, continuing the front-to-side hemline at
first, then making it gradually steeper and flattening out again as it approaches
the CB. It should be almost horizontal for the last 10 cm so that, if you unfold
the back and lay it flat, you get a gentle curve around the back (see sketch
above). Again, smooth the two layers out and pin them together. When cutting,
remember to add a turning allowance of about 1 cm.
Take the cheap fabric mentioned under "other materials" on page 1, the one meant to protect the underside of the train. Cut it into strips at least as wide as your train is long and sew as many of them end to end as needed to match the length of the robe hemline. Sew it onto the right side of the hem. If you do hand seams, use a running stitch rather than backstitch as you may have to replace the strips after a few years of use. Iron this seam flat, the allowances facing towards the robe. Forget all that you know about modern hems and turn the hem by folding the cheap fabric up - not along the seam, but about 0.5 cm into the cheap fabric. In other words, half a centimetre of the cheap fabric will be visible from the outside, which is why it should be a matching colour or a neutral unbleached cotton/linen colour. This way, the top fabric will not touch the ground and therefore not take damage.
Smooth the cheap fabric upwards from the hem on the left side and pin it onto the top fabric. Due to the curving hemline, you will have to tuck some darts to make the protecting strip lie flat. Sew the top edge to the top fabric with running stitch that hardly shows on the outside. Make sure, however, that you catch more than just one or two top fabric threads: If the friction of walking over rough ground pulled or even ripped threads of the top fabric, it would be contrary to the whole purpose of the protective strip. (BTW, this is also why you should choose smooth and lightweight fabric for the strip.) Iron the hemline and darts flat and lightly baste the darts to prevent them from bagging.
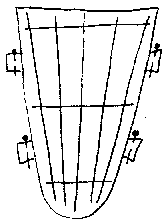 Now
for the stomacher. Take the piece of mock-up fabric on which the stomacher is
marked. Add 3 cm to each side, 1-2 cm to the top depending on how deep you want
the décolleté to be, and about 1 cm to the bottom edge. Round
off the bottom edge so that it smoothly bleeds into the side edges, as in the
sketch to the left. Cut along these new lines and add the fabric to your pattern
pieces.
Now
for the stomacher. Take the piece of mock-up fabric on which the stomacher is
marked. Add 3 cm to each side, 1-2 cm to the top depending on how deep you want
the décolleté to be, and about 1 cm to the bottom edge. Round
off the bottom edge so that it smoothly bleeds into the side edges, as in the
sketch to the left. Cut along these new lines and add the fabric to your pattern
pieces.
Cut the stomacher once in top fabric and twice in the same sturdy lining that you've used for the bodice lining. Add about 1.5 cm turning allowance in the top fabric, but none in the lining. The make-up of a stomacher resembles that of a corset in some ways. Baste the two lining layers onto each other, then mark boning tunnels on them. One in the CF runs vertically, the others fan out from there so that the outermost tunnels follow the side edge of the stomacher. Add horizontal tunnels near the top and waist and optionally a third one halfway between. Sew the tunnels and remember to keep the crossings between vertical and horizontal tunnels open. Insert boning and sew the tunnel ends shut.
Smooth the top fabric onto the base layer, pin or baste along the edges, and turn the turning allowances around the edges and under. Sew onto base with seam stitches that don't show on the outside. Cut 4 pieces of tape about 10 cm long, fold in half to form 5 cm long strips, and attach them to the back of the stomacher - one pair near the top, one near the bottom - so that they stick out as seen in the sketch. These tabs are used to pin the stomacher to the corset.
As for optional trimmings (ruchings, lace, flounces), please have good look at period paintings and extant garments before deciding what the trim should look like. I really mean the emphasis on good look: Most of the ubiquitous ugly "as if" costumes are only ugly and "as if" because the seamstress only had a superficial idea of what a rococo dress looks like. Most of the errors are in the pattern and sewing technique, but wrong trimmings can also ruin the overall impression. Remember that before ca. 1750, trimmings were not used. For a 1750-1770 robe, the most common trim was gathered or pleated strips of top fabric, pinked at both edges. A safe bet is to make a 4-5 cm wide pinked strip, gathered or box-pleated and sewn on along the midline, that runs along the front edge from the hem up, around the back and back down the other side. It can be sewn on straight or waving back and forth across the width of the robings. A safe bet for the jupe is a 20-25 cm wide pinked strip, gathered or box-pleated a few cm down from the top edge and attached to the skirt horizontally along the gathering line.
Next step: The Petticoat
Content, layout and images of this page
and any sub-page of the domains marquise.de, contouche.de,
lumieres.de, manteau.de and costumebase.org are copyright (c) 1997-2022 by Alexa Bender. All rights
reserved. See Copyright Page.

GDPO


This work is licensed under a Creative Commons License.